Disassembled tensioners and noted differences. However crankshaft rear oil seal bolt gave way under torque of 12 lbs. Now all work stops to helicoli the two long bolts attached to oil pan.
Triumph V8 Engine Rebuild
Thursday, April 26, 2012
Timing Chain Tensioners
Disassembled tensioners and noted differences. However crankshaft rear oil seal bolt gave way under torque of 12 lbs. Now all work stops to helicoli the two long bolts attached to oil pan.
Wednesday, April 25, 2012
Rear Oil Seal
Rear oil seal installed,
UPDATE: These bolts screw into what appears to be helicoil. I tried to torque them to spec and they failed at 11 pounds. Everything is on hold.
Oil pickup and sump cover attached.
Preliminary check of flywheel runout shows less than .005 runout at 4 inches from center of flywheel.
Pictures of jack shaft housing taken no clear indication of failure of integral bearings. Very little movement up, down or side to side noted.
Thursday, April 12, 2012
Waterpump Done
Decided to rebuild rather than purchase a water pump. With the help of friends and a press we got it done.
 |
| Side by Side comparison of old and new parts |
 |
| Cast flashing on bottom of impeller and bearings pressed out of basket |
 |
| Cast flashing removed noticed a ridge defect hope the gasket holds |
 |
| After trying to press the bearing into the cage first we realized you press the bearing ont the shaft first. |
 |
| Finished Product |
 |
Tuesday, April 10, 2012
April Update
 |
| Even Bank fully installed |
 |
| Odd Bank all but #1 installed |
Torqued rods to 45 pounds, used ARP assembly lube non seemed to over stretch. Measured height of piston at compression height. Highest piston is .080 inches high. Measured height of gasket which is also .080 inches high, we assume that the compressed height of the gasket will be .040 inches leaving .040 height between value and piston.
Best guess is that we will have enough space given that we are looking for 9:1 compression.
Thursday, April 5, 2012
Crankshaft Balanced and Piston Install Begins
Finally got the crankshaft sorted out. Having destroyed the first one "gaming" the Hines machine and discovering that there are no 60 over bearings for the replacement crankshaft I sourced a third crankshaft and immediately sent it out for professional balancing,
The balance included the disk cover as well. There was some residual wax and residual dust that had to be removed.
The crank has been laid and the rod clearances measured.
Ring gap was verified and documented.
Rings were installed, and pistons installed.
Care had to be taken with custom pistons manufactured to account for intake and exhaust value movement. The prior pistons were flat dished and it may be that orientation was not as important.
Now rod orientation and piston orientation to match intake and exhaust relief is critical.
The heads are being line honed.
The balance included the disk cover as well. There was some residual wax and residual dust that had to be removed.
The crank has been laid and the rod clearances measured.
Ring gap was verified and documented.
Rings were installed, and pistons installed.
Now rod orientation and piston orientation to match intake and exhaust relief is critical.
The heads are being line honed.
Saturday, February 11, 2012
The Saga Continues:
After much effort I found that I could not balance my crankshaft. My errors were so sever that once I found an expert to work on the crank the costs exceeded the success potential. So I purchased a used replacement which was 60 ever. I discovered too late that just because bearing are advertised as being available at 60 over the reality is something different! I sourced another crank and sent it to my rebuilder to be lightened.
In the meantime, I discovered that the heads were being scored by the camshafts. My vendor will also line hone the heads for me. Once this is done I can begin the process of removing the oil valley plugs and have the heads cleaned of the suspected glass beading.
I had an opportunity to see one of two heads that has been pre assembled and the joy of the project returned. In the mean time I've painted several parts.
Major activities to be done.
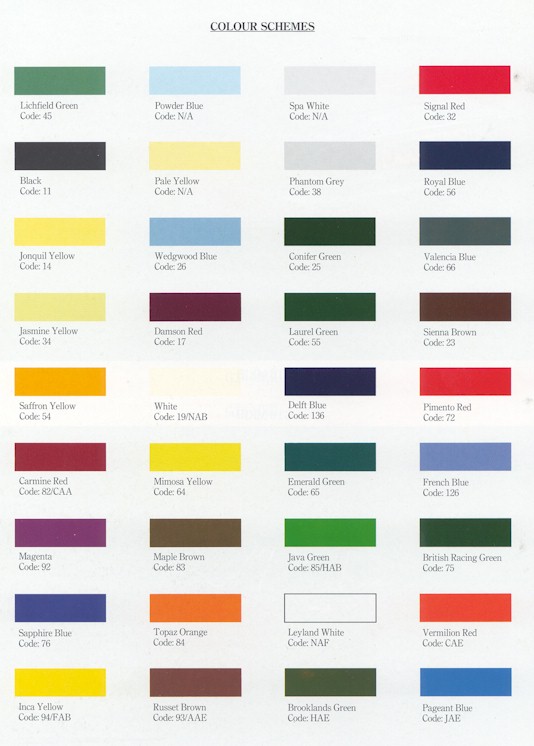
1. Painting of block may be directly related to what color I will paint the car. I am considering Sienna Brown to match my eventual paint choice. (Currently, the original #23 Sienna brown color is ahead in the polls, edging out Deflt Blue and British Racing Green.)
Earlier block colors included Orange to match the exhaust (it's so hot better get the gloves!, Black, Sienna Brown, White, Orange) I've seen Gothe landscapes at school and I am even considering a image of some sort.


Early contender

Sienna Brown

Delfi Blue?

British Racing Green?

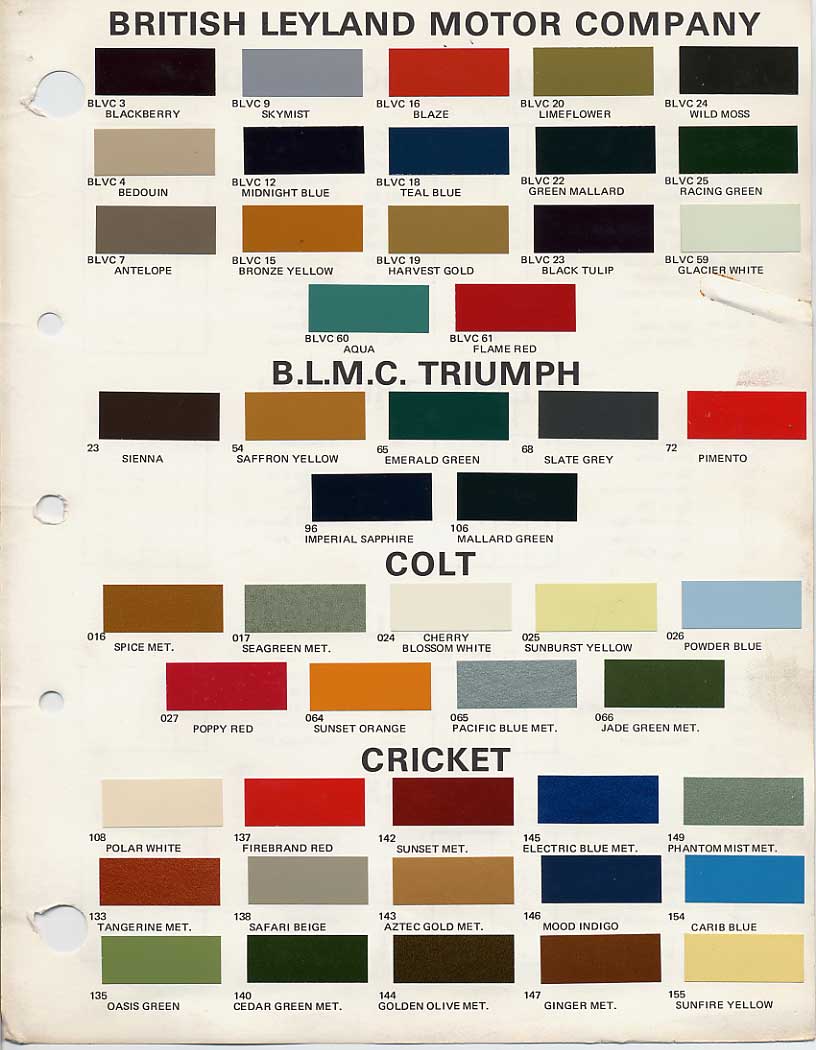
Original Triumph Color Images


http://www.classiccarhub.co.uk/tech/triumph-paint-colours.html

Earlier block colors included Orange to match the exhaust (it's so hot better get the gloves!, Black, Sienna Brown, White, Orange) I've seen Gothe landscapes at school and I am even considering a image of some sort.
Early contender
Sienna Brown
This Spitfire Color Chart is the best I've seen to date! Since the Spitfire and the Stag were both produced by Triumph and the color codes are identical, I'm comfortable using this as a reference point.
| Colour | Colour Code | Spitfire Mk1 | Spitfire Mk2 | Spitfire Mk3 | Spitfire Mk4 | Spitfire 1500 |
|---|---|---|---|---|---|---|
| White | 19 | ’63-’64 | All Yrs | All Yrs | All Yrs | ’74-’77 |
| Leyland White | NAF | - | - | - | - | ’77-’80 |
| Spa White | No code | ’62-’63 | - | - | - | - |
| Sienna Brown | 23 | - | - | ’69-’70 | ’70-’74 | - |
| Russet Brown | 93/AAE | - | - | - | - | ’77-’80 |
| Maple Brown | 83 | - | - | - | - | ’74-’77 |
| Vermillion Red | CAE | - | - | - | - | ’77-’80 |
Delfi Blue?
British Racing Green?
| Emerald Green | 65 | - | - | - | ’72-’74 | - |
| Laurel Green | 25 | - | - | ’68-’70 | ’70-’71 | - |
| Conifer Green | 25 | ’63-’64 | All Yrs | ’67-’68 | - | - |
| Lichfield Green | 45 | ’62-’63 | - | - | - | - |
| Java Green | 85/HAB | - | - | - | - | ’74-’77 |
| British Racing Green | 75 | - | - | - | - | ’74-’77 |
| Brooklands Green | HAE | - | - | - | - | ’77-’80 |
| French Blue | 126 | - | - | - | ’72-’74 | ’74-’77 |
| Powder Blue | No code | ’62-’63 | - | - | - | - |
| Royal Blue | 56 | ’64 | All Yrs | All Yrs | - | - |
| Sapphire Blue | 76 | - | - | - | ’70-’74 | - |
| Delft Blue | 136 | - | - | - | - | ’74-’77 |
| Pageant Blue | JAE | - | - | - | - | ’77-’80 |
| Tahiti Blue | 146/JAE | - | - | - | - | ’77 |
| Valencia Blue | 66 | - | - | ’68-’70 | ’70-’71 | - |
| Wedgwood Blue | 26 | ’63-’64 | All Yrs | All Yrs | ’70-’71 | - |
| Mallard Blue | 106 | - | - | - | ’72-’74 | - (See Note 1 |
Full Color Wheel located below:
Original Triumph Color Images

http://www.classiccarhub.co.uk/tech/triumph-paint-colours.html

2. Removal of oil valley plugs
3. Air flow heads for base line and decide if further porting will help produce horsepower.
4. Pre assemble the block with pistons
5. High Torque starter
6. Distributor
7. Measure Shims for value buckets.
8. Upgrade and measure head gasket. Payton seems to be highly recommended
I just might get on the dyno by April.
Fingers crossed.
Subscribe to:
Posts (Atom)


